Some figures are cast in multiple pieces, and need to be fastened together before painting. Sometimes the connection point is so small that cyanoacrylate (superglue) is not strong enough to fasten the parts by itself. In these cases we need to pin the parts together.
 |
| Fig. 1 An Etruscan "2nd Class Citizen Spearman". |
Shown is a 28mm Etruscan spearman by Gorgon Miniatures. The upper-class etruscan warriors could afford to arm themselves like Greek hoplites, while less wealthy Etruscan citizens had to make do with the less-cool-looking local armor and helmets. Compared to the familiar hoplite panoply, native Etruscan armor is strange and interesting-looking - instead of a cuirass, the spearman wears a pair of bronze plate-like circles on his chest and back.
 |
| Fig.2 The area of attachment between the shield and the spearman's knuckle is very small. |
The Etruscan shield is a forerunner of the famous roman scutum, and is held by a single handgrip in the center of the shield. On the real life shield, the hole in which the handgrip is placed is covered by a bulbous metal boss. This gives us very little area to make a connection between the parts.
Fortunately, the excellent shields from Gorgon have some thickness, and a substantial boss that we can drill into from the handgrip side.
 |
| Fig. 3 A #67 bit drills out a .032-inch hole; 1/32-inches or about 0.8mm. |
I use brass rod for pinning, usually the same 3/64th-inch size that I use for spears and flagpoles (about 1mm), but in this case I am using the next smaller size, 1/32th-inch in diameter.
I use a "pin vice" to hold the #61 numbered drill bit. To drill, just twirl the pin vice by hand, and curlicues of tin "swarf" will begin to emerge.
 |
| Fig. 4 The spear that the Etruscan is holding is made of 3/64-inch brass rod - a bit over 1mm. The bit will be a smaller size, 1/32-inch, about 0.8mm. |
I drill matching holes in both the back of the shield boss and in the knuckle of the figure's left hand. Then, I estimate the length of pin needed - in this case, about 3/16th of an inch (about 5mm) - and snip off the brass rod with a pair of snips. The small piece will want to fly across the room...
 |
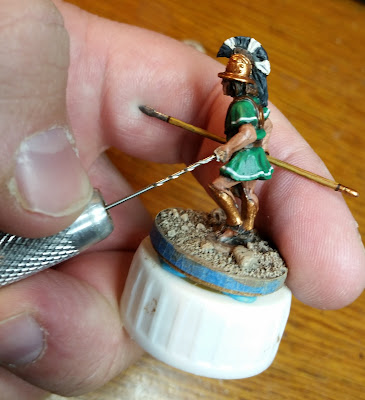
| Fig. 5 Drilling into the poor guy's knuckle with the pin vise. |
 |
| Fig. 6 Test-fitting the 1/32-inch brass rod in the shield's drill hole. |
 |
| Fig. 7 Snipping off about 3/16-inch or so of brass rod for the pin. |
Test fit the pin in each hole, then dab superglue in each hole, place the pin using needlenose pliers, and assemble.
 |
| Fig. 8 The pin is glued into its hole in the shield boss. |
 |
| Fig. 9 About to glue the pinned shield to the knuckle. |
The cyanoacrylate glue will "fume" as it sets up, and may leave white stains near the gluing point, which will require some paint touch up. I have read that cyanoacrylate fumes are used as one way of collecting a fingerprint.
 |
| Fig. 11 Complete! |
 |
| Fig. 12 The cyanoacrylate glue is still drying. The area around the join will need to be touched up with paint. |
Once the pin sets up, the connection should be strong enough for even careless handling.


